Sunday, 16 April 2017

Pressed flowers

Happy Easter everybody! Autumn is upon us now and the wet weather is cooling down to Winter. The days are becoming a little bit shorter and a little bit darker, so I wanted to preserve some of the sunshine left from summer!

Pressing and drying flowers is really simple and doesn't require any fancy materials. You just place your flowers however you want them to sit between two sheets of paper towelling, and squish the layers together with some heavy books. They could take from a few days to a week to dry depending on how warm and dry it is.

Some of the flowers come out really nice. Some can discolour, and go a little brown. I was so optimistic about the biggest white flower, but it turned out too discoloured to use for anything nice.

The idea of pressed flowers might make you think of grannies and outdated crafts, but they can make really pretty gift cards, and it's fun piecing and gluing together pretty patterns!


Next time I try this I would like to paint a watercolour background on the card. Wouldn't that be pretty, with blues and pinks and yellows?

Wednesday, 1 March 2017

Dyeing naturally - avocado pips and lady's bedstraw

They say the fun thing about natural dyes is trying different plants yourself and experimenting with colour. This dye pot started out as an absolute disaster - but ended up producing a really pretty peachy pink which I'm absolutely thrilled with! The colour of candy floss.

Today I thought it would be a good idea to include a step by step of how the whole natural dye process works. Keep in mind that I'm not an expert! Just writing from personal experience.
First, prepare your wool. What I'm using is carded, as per last time. But you could use spun wool, or fabric, particularly cotton or linen - natural dyes could produce some beautiful sheets, tablecloths or cloth napkins. Even wool straight from the sheep could be fine to use (washed first), as long as you were careful not to let it felt. If you are using wool, weighing it is a good idea, especially if you are using a particular pattern for your project. I weighed up 5 ounces (150gram) which will be enough for a small project. Each textile will produce a different colour, and each time you dye will likely produce a different shade of colour.
 Lots of people say to add wool after the dye has simmered, so that it doesn't felt. Surely this would result in a much less vibrant colour? Personally, I roughly sew a bag out of muslin or old cotton sheet, with a small pocket with string encased around one end to use as a drawstring, then evenly distribute the wool inside. As long as you use a low simmer and don't agitate or stir the bag, just turning it over a couple of times during the process to absorb the dye evenly, the wool won't felt.
 Add the bag or your fabric to lukewarm water, the temperature of a baby's bath. This means the wool won't get a shock. Add your ingredient and bring to a simmer. Simmering for about 40 minutes releases the dye.
 After reading somewhere on the internet that you could produce a pale pink dye by simmering whole avocado pips, I collected 5 fresh avocado pips and attempted dyeing with them. Well... that pot simmered for an hour and a half and the water was still as clear as when it came out of the tap!
 Not to be deterred, the search was on for other things that produce a pink dye. Mum is an avid gardener and can identify most plants. After going through a list of natural pink dyes, she pulled some lady's bedstraw right out of the garden. We discarded the leaves and stems, hosed down the roots to clean the soil off and added them to the dye pot.
 40 minutes later, the bag had turned coral pink! I took the pot off the heat and let it sit overnight, before rinsing it out twice with lukewarm water and spinning it on gentle in the washing machine. Afterward it was layed out on a towel to dry outside.
 The colour is vibrant and the wool is absolutely beautiful. Success!

Tuesday, 19 April 2016

Dying wool naturally - eucalyptus

 When I first started spinning, my parents gifted me with a large bundle of carded white wool from the sheep on dad's farm. I believe it's a sort of romney mix. It's soft, only a little coarse, and comes up beautifully fluffy and white when washed.
I've recently become interested in using plants as a natural dye. My bible when it comes to fleece, spinning and dyeing is 'The New Zealand woolcraft book', by Constance Jackson and Judith Plowman. It was printed in 1983, but is the most informative, helpful book that is available on the subject (in my opinion, anyway!) They talk about using mordants (chemicals which influence the colour) but I wanted to just use a plant itself as a really 'back to basics' method.
 The plant I decided to use was a eucalyptus (gum) tree. One with rounder, rather than long, leaves. I gathered semi dried leaves, ripped them up, crushed the twigs, and put them in a quickly sewn cotton bag. The bag was added into a large soup pot half full of water and left to steep for 3 days. I then brought it to a simmer for a few hours on the stove, and let it cool. The wool was soaked in warm water for half an hour, and then added to the soup pot, which then was brought to a simmer for another few hours. I let it cool, and then rinsed and dried the wool. It's light and fluffy, doesn't smell like anything, really, and is now this interesting golden colour. I was expecting more of an orange, and don't know how colourfast it will be, but I'm excited to spin it! The next thing is - what to make? and what natural dye to try next?
Above - naturally dyed wool. Below - (the before) washed undyed wool.

Saturday, 16 April 2016

Being honest

I feel like now is a good time to become totally honest with myself. Since starting this blog, I've been so lacking in motivation to post regularly it's almost a joke. I've been following the perfect instagram posts, perfectly lit and staged photographed blogs, witty writing and people with the confidence to throw out their own brand into the world with a big 'f' you if you don't like my brand! I'm a strong independent woman!! that it's kind of intimidating to put a little stamp on the internet.
But oh my gosh. I am not that. I feel more like plain jane from the suburbs, who lives in a small unassuming house, with furniture put together from various opshops and handmedowns, sitting on my back porch step as I do every day, sipping coffee and thinking about how I really must finish all the projects I've started, and perhaps vaccuum the house in case any one comes to visit. Why would anyone want to read my blog? I'm not an expert on anything. I shouldn't be the person that offers 'how to's,' and 'diys', because really, I'm just learning myself.
But. Despite this, I really do have many projects on the go. And I really want to share them.
 I often feel as though I have so much creative energy and so much to offer, but they're like wisps that hang around in my periphery. I try to turn and catch them - but they disappear, and I'm left standing with a handful of empty air. Hopefully, with a blog, that creativity might be channeled into something that's more visible. Hopefully, people will read, and relate, and be able to share their projects, and share advice they've gained on their own road to creativity.

Monday, 28 December 2015

Toilet roll animal puppets

 The humble toilet roll. We all use them, we all throw out that cardboard tube that is left at the end. It makes you wonder how much cardboard tube is produced in the country every year, doesn't it? Luckily, its a recyclable material. But as well as being recyclable in the bin, it can also be recyclable at home and used for simple craft projects that barely cost a thing. Ideal, if you're low on money, or like the idea that you can still get rid of this at the end and not have more toys cluttering up the home. It can also be a fun way to let your kids paint and draw on their own animals or creatures, to let their imagination run wild!
 The materials used are simple. A 'dirty' surface to work on (like sheets of newspaper), felt tip pens. some paint (optional, really, if you don't want paint everywhere). I used a testpot of waterbased paint.
 Fold the front and back of the cardboard tube down to make ears, and a cut can be made around the base of the roll to create a tail.
 You could tape a kebab or popsicle stick onto the inside of the roll, to make your animals into puppets. Put on a puppet show!
 What kind of animals can you create?

Sunday, 26 July 2015

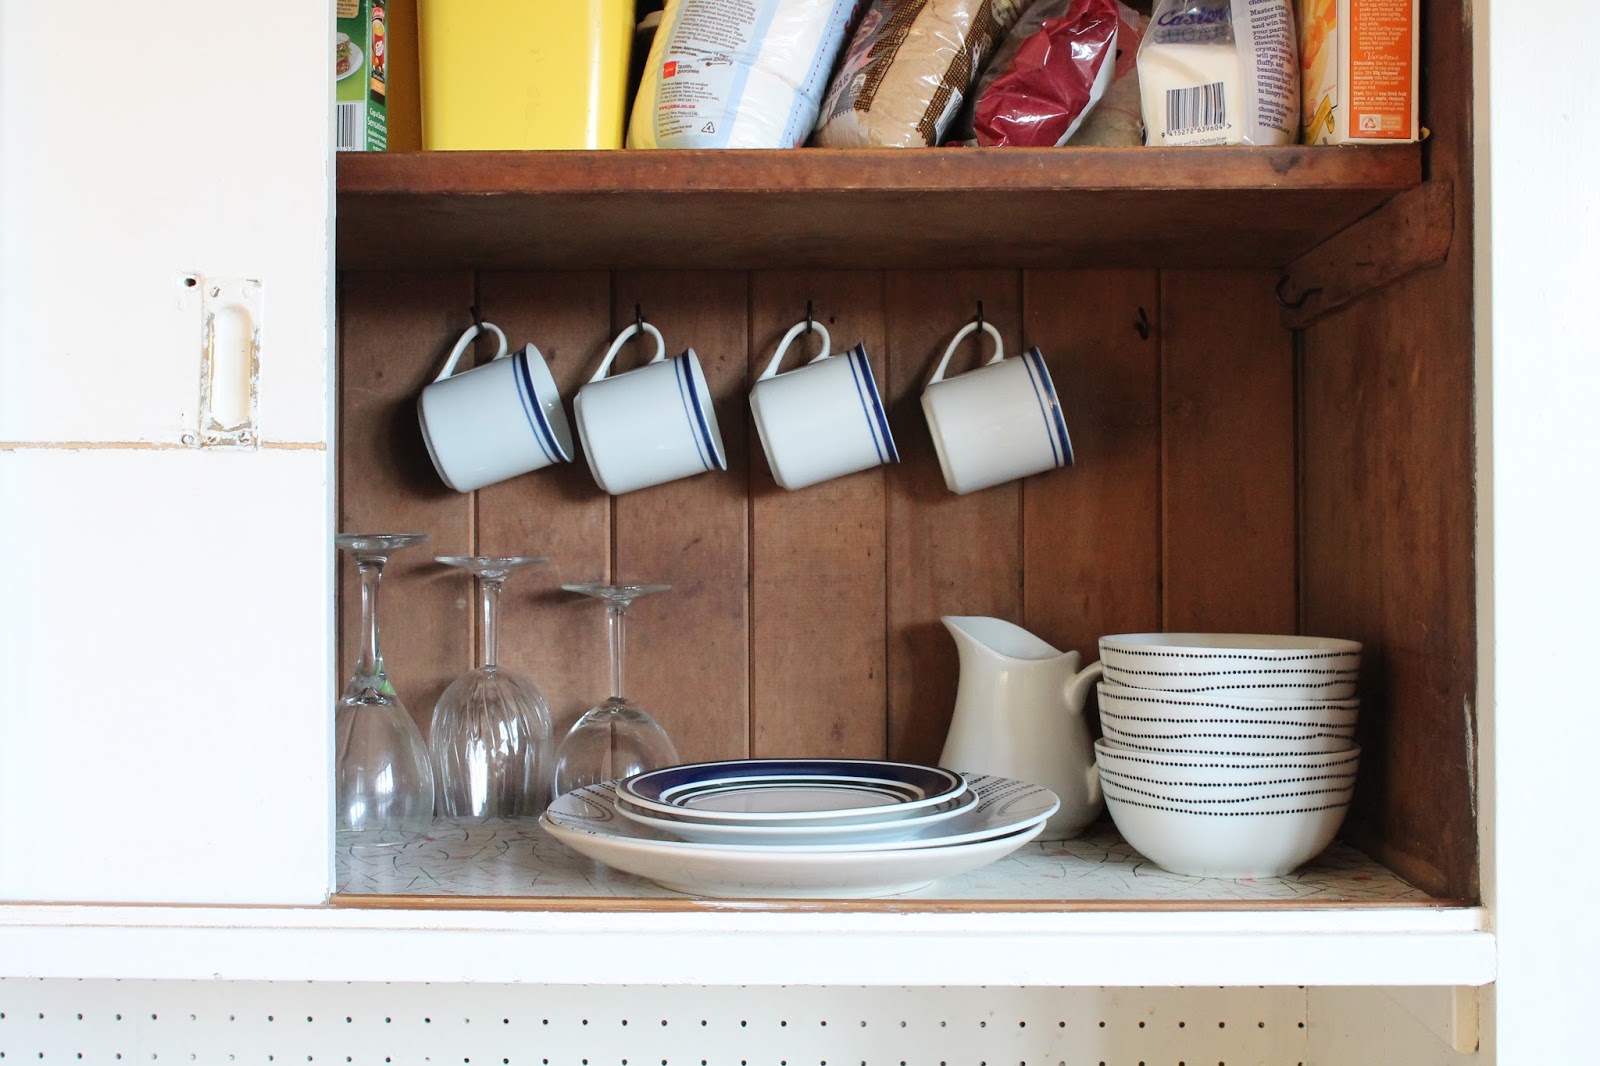
Hang up your mug

 Matt and I have been obsessively watching Australia's season 3 of house rules and it is so exciting. Usually we enjoy watching The Block, but have started to become a little bit disappointed with the rooms that are produced. They are fantastic, showroom, million dollar rooms, made to be judged by designers and purchased by people with millions. House Rules is much more personal, and the ideas and designs are much more realistic and inspirational for the average person on an average wage.
I've been thinking a lot lately about what makes a home, and the small details of each rental house that Matt and I have lived in over the years that appeal to us. Together we have lived in 6 different flats/houses, from apartment style, to awful student flats, to basic two bedroom homes. Each of them have had features we can look back on and consider - features we definitely want to avoid (bedroom with no windows, a gazillion stairs, no off street parking) or most definitely have (oh, how I miss the dishwasher and bathtub in our old house!). but as well as the obvious, there are smaller details that I feel like I want to remember, and be able to incorporate into our next home - which will hopefully be all ours to change how we wish.
 For the first year we lived in this particular house, I never really took much notice of these hooks in the overhead cupboards. When I bought this set of vintage teacups from the hospice op shop (there's also another one in storage) it was proving tricky to find a place for them, so they were put on the hooks. Best. things. ever. What a great way to show off a collection, and the teacups and mugs don't take up any space in the cupboard. Definitely a small homely feature that I would incorporate in the future.
Spacing: The hooks are 11cm apart and 33cm from the bottom shelf, and they comfortably fit a collection of average tea/coffee mugs, as well as these smaller ones.

Friday, 8 May 2015

Beef and Lentil casserole

 Autumn is settling in and so is the cold weather. Lately I've been making a lot of slow cooked meals, which are easy to put together a little time in advance. It only takes about 10 minutes of prep and you're not caught trying to whip something up last minute when you're hungry and grumpy and tired. Slow cookers seem to be popular at the moment, and seem for a lot of people to be a really good investment. Personally I don't have a slow cooker - but find that the oven works fine for us. There is something really simplistic about throwing a bunch of ingredients in a crock pot and opening the oven 2-3 hours later to find an amazing cooked meal. It just gives you a very warm and cozy feeling. The aroma of something delicious cooking is always very welcoming too.
Here's an easy recipe for a beef and lentil stew which serves about 3-4 people. Beef is the cheapest option, but could easily be substituted for cubed lamb or even lamb shanks. Some people seemed to be deterred by lentils - don't let them put you off. They have a very mild flavour and add a nice texture to the dish.
 In a casserole dish, place 1 cup of orange lentils, 2 chopped carrots, 2 stalks chopped celery, and 2 cloves of finely chopped garlic.
 Dot over about 400g cubed stewing beef or lamb. Add two cans of chopped tomatoes, and 1 chopped onion. Sprinkle over some thyme and parsley, and press in a bay leaf for flavour if you have one (just remove it at the end.)
This is essentially a layered dish, so it doesn't have to be mixed together unless you want to.
Cover casserole dish with a lid, or tin foil tightly wrapped over the top to create a nice seal.
Place in the oven at 150.Celcius for 2.5 to 3 hours depending on how tender the meat is.
This could also be made without meat as a vegetarian dish, cooked for only 2 hours. Either way, it is amazing served with buttered bread, and like all stews, tends to taste even better the next day.