Showing posts with label DIY. Show all posts

Saturday, 21 October 2017

Make felt balls


I have a vague memory of making rainbow coloured felt balls as a child. I remember having lots of fun making them, but then once they were done, thinking what exactly do I DO with a felt ball? How is this actually going to be useful in my life? But now, oh my gosh. I have IDEAS of what to do with them. While looking at Instagram the other day, I saw that Elsie from A Beautiful Mess mentioned on instagram stories about how she buys wool balls on etsy, puts drops of essential oils on them and puts them in the drier to make her clothes smell nice. Well, what better motivation to have a go at making them again, especially as we have a drier!
 I actually had no idea how to make a felt ball, but if you're new to working with wool, there are a few basic principles about felting. If you had hot water, soap, and lots of agitation, you're going to make wool felt. So with this in mind, I put together what turned out to be a successful recipe for making felt balls. It's so nice when a plan comes together!
 Get some wool. It doesnt matter if it's carded or not, because youre going to pull at it so all the fibres are seperated. Remember it will shrink down a bit in size once the ball is complete.
 I popped my wool into a stocking, just to protect my hands from the hot water, and to hold the shape. Then dip it into scalding hot water, and rub a bar of soap (just plain hand soap) over the stocking. Dip in to the hot water again, and then squeeze the water out. Then roll it between your hands. Take it out of the stocking and roll roll roll in circular motions. It will feel like a soft pliable ball to start with but slowly gets more and more solid.
Once it was firm enough, and the loose ends were gone, I dipped them in clean hot water, squeezed out the excess and then put them out to dry.
Ooh there's nothing like the smell of fresh wool. And they are pretty enough to be decorative! I took two of the wool balls and put drops of lavender, bergamot and ylangylang essential oils and threw them in the drier. To be honest, the clothes didn't pick up the scent. I'll give it another go, but thought that actually, they could work in a closet or clothes drawer. and wouldn't a whole lot of little balls in different colours make a cute garland to hang on the wall? Or different sizes to hang on a mobile? Or as christmas tree decorations (an alternative to a plastic bauble)? So many possibilities!

Sunday, 16 April 2017

Pressed flowers

Happy Easter everybody! Autumn is upon us now and the wet weather is cooling down to Winter. The days are becoming a little bit shorter and a little bit darker, so I wanted to preserve some of the sunshine left from summer!

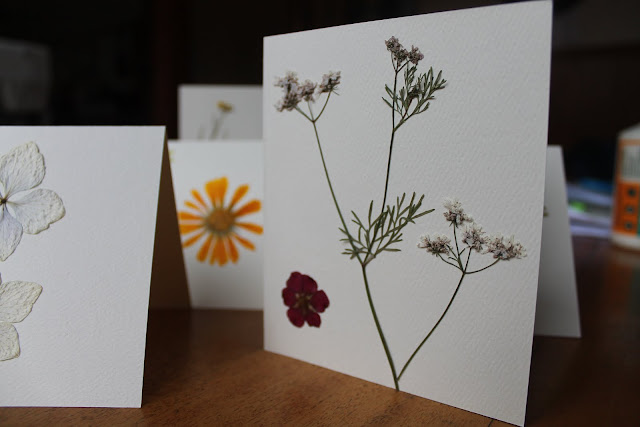
Pressing and drying flowers is really simple and doesn't require any fancy materials. You just place your flowers however you want them to sit between two sheets of paper towelling, and squish the layers together with some heavy books. They could take from a few days to a week to dry depending on how warm and dry it is.

Some of the flowers come out really nice. Some can discolour, and go a little brown. I was so optimistic about the biggest white flower, but it turned out too discoloured to use for anything nice.

The idea of pressed flowers might make you think of grannies and outdated crafts, but they can make really pretty gift cards, and it's fun piecing and gluing together pretty patterns!


Next time I try this I would like to paint a watercolour background on the card. Wouldn't that be pretty, with blues and pinks and yellows?

Monday, 28 December 2015

Toilet roll animal puppets

 The humble toilet roll. We all use them, we all throw out that cardboard tube that is left at the end. It makes you wonder how much cardboard tube is produced in the country every year, doesn't it? Luckily, its a recyclable material. But as well as being recyclable in the bin, it can also be recyclable at home and used for simple craft projects that barely cost a thing. Ideal, if you're low on money, or like the idea that you can still get rid of this at the end and not have more toys cluttering up the home. It can also be a fun way to let your kids paint and draw on their own animals or creatures, to let their imagination run wild!
 The materials used are simple. A 'dirty' surface to work on (like sheets of newspaper), felt tip pens. some paint (optional, really, if you don't want paint everywhere). I used a testpot of waterbased paint.
 Fold the front and back of the cardboard tube down to make ears, and a cut can be made around the base of the roll to create a tail.
 You could tape a kebab or popsicle stick onto the inside of the roll, to make your animals into puppets. Put on a puppet show!
 What kind of animals can you create?

Friday, 11 April 2014

DIY photo frame display


I love the idea of having photographs on the wall and being able to change them up instead of having only set memories on the wall. Inspired by the idea of having photographs pegged to a clothesline string,  I decided to create my own using a large frame. The photos can be changed up and moved around. This is a simple DIY that only takes about half an hour and is easy on the wallet. This DIY cost me about $25, using a frame from a second hand store and other items from a hardware store and $2 store.


 Things you will need:
* A large frame, made of something you can nail into (preferably wood or gib).
* A hammer
* Small nails, with a flat head
* Twine or string of your choice
* Scrapbooking pegs

 Step 1
Gather your materials.
Remove the picture from the frame and clean and put back the glass.
Decide where you want your twine to string across. Allow for room for the photographs to hang.
Mark these points and start nailing in your nails. You could do more if you wanted to change around the position of the twine, or hang the frame on its side.
I didn't have flat head nails so nailed them in halfway, and then across so they were bent down and would hold the twine.
Don't forget extra nails to hang the frame on the wall!
Step 2
Measure, cut, and firmly tie the twine to your chosen positions.
Step 3
Attach your scrapbooking pegs, position your photographs, and hang on the wall!
Enjoy!