Showing posts with label project. Show all posts

Sunday, 16 April 2017

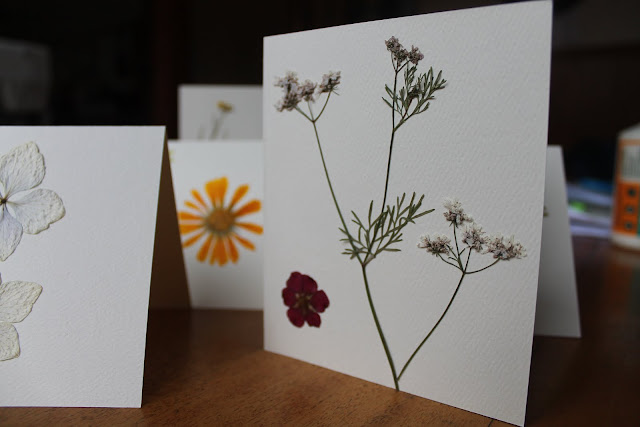
Pressed flowers

Happy Easter everybody! Autumn is upon us now and the wet weather is cooling down to Winter. The days are becoming a little bit shorter and a little bit darker, so I wanted to preserve some of the sunshine left from summer!

Pressing and drying flowers is really simple and doesn't require any fancy materials. You just place your flowers however you want them to sit between two sheets of paper towelling, and squish the layers together with some heavy books. They could take from a few days to a week to dry depending on how warm and dry it is.

Some of the flowers come out really nice. Some can discolour, and go a little brown. I was so optimistic about the biggest white flower, but it turned out too discoloured to use for anything nice.

The idea of pressed flowers might make you think of grannies and outdated crafts, but they can make really pretty gift cards, and it's fun piecing and gluing together pretty patterns!


Next time I try this I would like to paint a watercolour background on the card. Wouldn't that be pretty, with blues and pinks and yellows?

Sunday, 25 May 2014

Winter knitting


 This past month has flown by and we have been busy settling into our new home. The weather has been absolutely horrific and at the moment we are holed up in our study with the heater on, shivering under blankets as it hits freezing temperatures after a hurricane roared through town yesterday. I forgot how absolutely cold it gets near the sea and it's a big shock to the system. I suspect I will have to stock up on thermals and merino jerseys before this week is out, just to stay warm. We are so lucky that we moved all our household items before this bad weather hit.

In an attempt to create a wooden headboard for our bed, I ventured out to Mitre 10 and got blown about 20metres down the parking lot by a gust of wind, and then saturated with torrential rain. Needless to say that project is on hold! There are some other creative projects going on though.. I haven't mentioned this before on the blog, but in November an elderly lady got me inspired to try my hand at knitting and it's making for a great winter hobby. I went to the op shop and bought some knitting needles from the 20 cent jar and some yarn from the warehouse (because I didn't know where else to go) and caught the knitting craze. This hobby is incredibly addictive! It's so rewarding learning new stitches and seeing the finished product of (suprisingly) hours of work. Talk about practicing patience! The online ravelry community is amazing to be a part of, there are thousands of free patterns available for knitters and crocheters and all sorts of forums to go to for help and advice or a chat. Goes to show that knitting is not just for the older generation!
Here are some items I have knitted so far this year, in iphone quality as my camera has disappeared amongst the boxes for now. Right now I'm working on a romper. Yarn expensive, especially pure wool, but I'm hoping to make a collection of things for when my friends and relations start to have babies. (Mid twenties - it's starting to happen!) There is an exciting project in the works that I am going to be starting on shortly, for real and not just on paper. Now that we live in the city where resources like fabric are a lot more accessible, with a large range, I'm thrilled to be able to start on something I've been thinking about for the past year or so. Hopefully it all happens. Stay tuned!


Friday, 11 April 2014

DIY photo frame display


I love the idea of having photographs on the wall and being able to change them up instead of having only set memories on the wall. Inspired by the idea of having photographs pegged to a clothesline string,  I decided to create my own using a large frame. The photos can be changed up and moved around. This is a simple DIY that only takes about half an hour and is easy on the wallet. This DIY cost me about $25, using a frame from a second hand store and other items from a hardware store and $2 store.


 Things you will need:
* A large frame, made of something you can nail into (preferably wood or gib).
* A hammer
* Small nails, with a flat head
* Twine or string of your choice
* Scrapbooking pegs

 Step 1
Gather your materials.
Remove the picture from the frame and clean and put back the glass.
Decide where you want your twine to string across. Allow for room for the photographs to hang.
Mark these points and start nailing in your nails. You could do more if you wanted to change around the position of the twine, or hang the frame on its side.
I didn't have flat head nails so nailed them in halfway, and then across so they were bent down and would hold the twine.
Don't forget extra nails to hang the frame on the wall!
Step 2
Measure, cut, and firmly tie the twine to your chosen positions.
Step 3
Attach your scrapbooking pegs, position your photographs, and hang on the wall!
Enjoy!